WARNING: This English version is translated by AI from the Chinese version.
After failing to run Chunithm HDD using wine, I turned to another path: dual boot system.
But when partitioning, looking at my computer’s limited storage space, I wondered if I could install Windows on a virtual hard disk. I asked GPT, and it said no. Then I asked again if there was a way to break through the 60hz limitation of virtual desktops in virtual machines to achieve the same refresh rate as the screen. It said yes: GPU passthrough + Looking Glass.
Looking Glass uses shared memory between the Guest machine and Host machine to transmit video, so latency can be around 1ms. At least that’s what they claim, and I didn’t feel any latency when using it.
My distribution is Arch, so the following steps are all configured in an Arch+AUR (paru) environment. Other distributions are no different, just the package names might be different (and might not have packages).
Since GPU passthrough configuration is needed, my solution is to create a new GRUB boot entry, allowing you to choose whether to enter the GPU passthrough system at boot time.
1. System Requirements
Looking Glass official documentation says:
The most basic requirement for using Looking Glass is to have two GPUs. The following configurations all work:
- Two discrete graphics cards (dGPU)
- One discrete graphics card and one integrated graphics card (iGPU), which is typical for most laptops
- One discrete graphics card or integrated graphics card, and a virtual GPU (vGPU) supported by certain hardware.
Note that some iGPU users may have limited resolution and refresh rate available due to memory bandwidth limitations, as iGPUs use system memory. PCIe bandwidth is also a limiting factor, so both GPUs should have at least PCIe3 x8 or PCIe4 x4 speed.
…
The graphics card used by the Guest machine must be connected to a physical monitor, or a cheap dummy plug. If the graphics card is not connected to any device, Windows will shut down the GPU output by default, and Looking Glass won’t work. If you’re using vGPU, it should be connected to a virtual display to meet the requirements.——This can be solved by installing virtual drivers, which is what this tutorial covers.…
They also recommend using a CPU with hyperthreading capability.
This tutorial is for the configuration of one discrete graphics card and one integrated graphics card.
And basically, your computer needs to support VT-x/AMD-V and IOMMU (VT-d/AMD-Vi) technology.
You can check IOMMU by running the following command:
|
|
If not enabled, first turn on the corresponding switch in BIOS, then add intel_iommu=on iommu=pt or amd_iommu=on iommu=pt to the GRUB_CMDLINE_LINUX_DEFAULT item in /etc/default/grub. Finally execute:
|
|
Reload the configuration, then restart. After restart, run:
|
|
If there are words like enabled IOMMU, it means IOMMU is currently enabled. Next, you need to check if the graphics card is in an independent IOMMU Group. If not (for example, if the sound card is also in there), it should theoretically still work, as long as it’s not a system core component. This article only covers the situation where the discrete graphics card is in an independent IOMMU Group. Run:
|
|
Look at the first part (bus address) of the discrete graphics card line, something like 01:00.0. If you also want to passthrough other PCIe devices, you can check the IOMMU Group this way too. Remember it, then run:
|
|
A lot of stuff will come out. Taking mine as an example:
|
|
My graphics card’s bus address is 01:00.0, so that’s line 5 above. The middle number 15 in this line is the Group it’s in. Next, I need to search through all the output to see if there’s another device also in group 15. If not, it means your discrete graphics card is in an independent IOMMU Group and you can continue.
Suppose I also want to passthrough the device with bus address 00:14.0, but I find in the second command that its group is 8, and there’s another device also in group 8, then I need to use:
|
|
To check the name and function of this device, and determine whether it needs to or can follow the device I want to passthrough.
2. Configure GRUB Boot Entry
Since GPU passthrough needs to be applied with a restart, putting it in GRUB is actually a good choice. Of course, there are ways without restarting, namely loading the vfio kernel module in real-time, but it’s still not recommended because sometimes applications don’t shut down cleanly, which is quite troublesome.
-
Note, this assumes your discrete graphics card is in an independent IOMMU Group.
-
Note, the following steps change the default setting of the
vfiokernel module to passthrough the discrete graphics card, meaning once the vfio module is opened, it will automatically take away the discrete graphics card, even in normal boot mode. -
If you don’t want this to be the default behavior, you can move
/etc/modprobe.d/vfio.confto another location (like/etc/modprobe.custom.d/vfio.conf), and modify it using theHOOKSitem in the corresponding/etc/mkinitcpio.conf.d/vfio.conffile. You can search for specific operations or ask AI.
1. Configure Kernel
First execute:
|
|
Find your discrete graphics card’s Vendor:Device ID. Mine is 10de:1f97, modify according to your situation. Then run the following command, where [VDID] should be changed to your own:
|
|
Then run:
|
|
Then edit the MODULES item in /etc/mkinitcpio.conf.d/vfio.conf:
|
|
Edit /etc/mkinitcpio.d/linux.preset.
- Note, if you’re using linux-zen or another kernel, the name here might change accordingly.
Add 'vfio' to the PRESETS column, then add two items below (or more, modify according to your situation):
|
|
My file finally looks like this (using linux-zen kernel):
|
|
Then run:
|
|
to update the configuration.
2. Configure GRUB Boot Entry
Now assume you’ve already modified the GRUB_CMDLINE_LINUX_DEFAULT item in /etc/default/grub. If not, go to the steps above to modify and update.
Then open the /boot/grub/grub.cfg file and look for the line ### BEGIN /etc/grub.d/10_linux ###. The first menuentry should be your main boot entry, copy it entirely, like this:
|
|
Several items have been replaced with [...], but there’s actually content there, just copy directly. Then open /etc/grub.d/40_custom, go to the bottom, and paste it in.
Next:
-
Modify the entry name
-
Add
intel_iommu=on iommu=ptto the end of thelinuxline (if it’s already there, ignore) -
Change the name of the second
.imgin theinitrdline toinitramfs-linux-vfio.img(the name written in/etc/mkinitcpio.d/linux.presetabove).
My configuration file finally looks like this:
|
|
Don’t copy blindly. If you want to modify the GRUB interface wait time, you can change /etc/default/grub. Then run:
|
|
Reload the configuration, then restart. When restarting, you can directly choose to enter the VFIO boot entry and should successfully enter the desktop. At this time, run:
|
|
You can check if the discrete graphics card has been separated. If there’s Kernel driver in use: vfio-pci, then it’s successful.
3. Installation
1. Packages
I’ll use paru for unified installation:
|
|
Next, you need to calculate the required shared memory. This memory is related to the maximum resolution you want to use, not the refresh rate. The formula can be found in the documentation. They also provide a reference table, which you can use directly.
Although this table provides corresponding values for SDR and HDR, they actually don’t recommend enabling HDR because:
-
Neither Xorg nor Wayland can use this HDR
-
GPU drivers or hardware will convert it to SDR
-
It consumes memory, bandwidth, CPU, and other resources (big eater).
In short, unless you want to find fault, there’s no need to enable it.
2. Configure IVSHMEM
Generally, using the KVMFR kernel module is sufficient; the other method is not needed. This module has been installed above and needs some setup.
Configure auto-loading. Run the following, where 32 should be modified to your shared memory according to your situation:
|
|
Then run:
|
|
This module will automatically create a /dev/kvmfr0 file. Next, modify the permissions of this file. Edit /etc/udev/rules.d/99-kvmfr.rules, where user should be changed to your username:
|
|
You can restart now. You can also run:
|
|
to manually start the KVMFR module, where 32 should be changed to your shared memory. Run the following to check if it started:
|
|
If there’s kvmfr: creating 1 static devices, then it’s normal.
3. Configure libvirt-qemu
Modify /etc/libvirt/qemu.conf, look for cgroup_device_acl in it, uncomment and add "/dev/kvmfr0" to the last line (don’t forget to add a comma). After modification, it should look like this:
|
|
Then run:
|
|
to start the built-in NAT.
- Note, if you have enabled DNS override function in your proxy, it probably won’t start. In this case, please modify the DNS listening port in proxy settings to a non-53 port, then run the command again.
Then restart the service:
|
|
4. Configure Virtual Machine
Now you can open virt-manager. Before creating a virtual machine, first click Edit -> Preference on the main page and check Enable XML editing. Then click the new button to create a virtual machine.
At the confirmation interface at the end of creation, check the Customize configuration before install option, then click Finish. Next, perform some detailed configurations:
-
In
Overview -> Firmware, select the option withx64 OVMF secbootin it -
If your CPU supports hyperthreading, you should manually configure it in
CPUs -> Topology(Note, The number of threads here is for a single physical core, that is, it can be configured as2unless otherwise specified.) -
Delete
Tablet -
In
Video QXL, switch theModelitem toVGA. -
Looking Glass recommends adding Vitrio Keyboard and Vitrio Mouse, but I couldn’t find where Mouse is, so I only added a keyboard.
Next, click Add Hardware -> PCI Host Device, find your graphics card, then click Finish. Keep everything else as default. Finally, click Begin Installation at the top to start installation.
Then it’s installation. Yeah. Installation. Yeah. So exciting. Aren’t you excited?
5. Settings in Virtual Machine
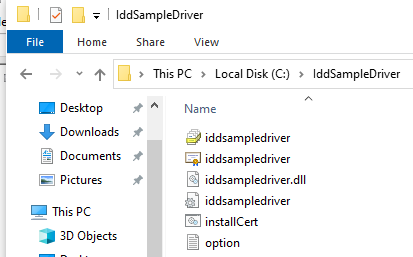
After installation is complete, install drivers in the virtual machine, then go to IDDSampleDriver’s Release page to download the virtual display driver, and extract the folder inside to the root of C drive, like this:
Next, install the virtual display driver:
- Run
installCert.batas administrator to install the driver certificate. - Right-click
iddsampledriver.infand clickInstall. - Open Device Manager, click any device, then click the above:
|
|
Then like this:

Then Next all the way to the end, at which point you should hear the device connection sound.
You can modify resolution and frame rate in C:\IddSampleDriver/option.txt. It’s recommended to modify it to the specifications of the screen you want to use.
Next, shut down the virtual machine, open the configuration interface, and click the XML tab on the right side of the Overview interface.
Make the following modifications:
-
Change the first line
<domain type="kvm">to<domain type='kvm' xmlns:qemu='http://libvirt.org/schemas/domain/qemu/1.0'> -
Paste the following configuration below the first line. Where the number in
'size':33554432should be changed toyour shared memory(MB) * 1024 * 1024:1 2 3 4 5 6<qemu:commandline> <qemu:arg value="-device"/> <qemu:arg value="{'driver':'ivshmem-plain','id':'shmem0','memdev':'looking-glass'}"/> <qemu:arg value="-object"/> <qemu:arg value="{'qom-type':'memory-backend-file','id':'looking-glass','mem-path':'/dev/kvmfr0','size':33554432,'share':true}"/> </qemu:commandline> -
Scroll to the bottom, find
<memballoon model="virtio">, and change it to<memballoon model="none">. -
Note, this item will cause the virtual machine to occupy all memory at once, so allocate it properly.
Next, start the virtual machine. Open the Looking Glass Host download page (it’s Host) in the virtual machine and double-click to install.
4. Usage
Open the system settings in the virtual machine and modify the resolution of the virtual screen. Then run on the Host machine:
|
|
Now you should already be connected to the virtual machine!
But there are still some things to do after entering…
-
Turn off mouse acceleration in the virtual machine, otherwise the two mouse accelerations will stack together
-
You cannot delete the
Display Spicedevice in virtual machine settings, because Looking Glass usesspiceas fallback and for some device connections -
If you want to turn off the
spicescreen, because Looking Glass will occupy thespicedevice, making it impossible to access the desktop from virt-manager, you can first drag the settings window to the position of the virtual display in the virtual machine, then uselooking-glass-clientto connect to the virtual machine
A few more tips:
-
To use clipboard sync function, you can install
spice-guset-toolsin the virtual machine. Note, it’s recommended to install this after everything is configured. I tried it during the driver installation step and got a black screen… -
You can check available options in Looking Glass documentation. The
-m KEY_RIGHTSHIFTabove is my own setting, because the default shortcut key isScrLk, which I don’t have. Use ‘-F’ to automatically enter fullscreen, use ‘-s’ to turn off Spice, use ‘-S’ to turn off the virtual machine’s screensaver. -
If shadow borders appear after the
looking-glass-clientwindow goes fullscreen, you can try maximizing first and then using the shortcut key to enter fullscreen.
The Looking Glass team is recently integrating IDD as well, so in the future you won’t need to manually configure virtual displays, just install Looking Glass Host for one-click completion, which will be much more convenient.
Easter egg (not really)
Reference links:
https://gist.github.com/Ruakij/dd40b3d7cacf5d0f196d1116771b6e42
https://github.com/ge9/IddSampleDriver/releases/latest
https://www.reddit.com/r/VFIO/comments/wj6zhz/gpu_passthrough_looking_glass_no_external/